Post-installation steps
One more step is needed to complete the installation:
- Give rules access to a profile via 2 methods:
- by assigning a Permission Sets
- by modifying a profile
 |
For advanced user, those who access to the “Galigeo Admin” tab, the analytics thematic wizard is a connected app hosted on Heroku. Following to the Java OAuth workflow given by Salesforce, be sure the option “View Setup and Configuration” is enabled in the profile properties or in the “Permission Set”. |
- Create a custom Geolocation field for each object that would be mapped
In this article
- First Method: give rule access by creating a Permission Sets
- For an end user
- For an admin user
- Second method: give rule access by modifying a profile
- Add a Geolocation field
First Method: give rule access by creating a Permission Sets
Using Permissions Sets is a more flexible way to give access for users to specific feature in Salesforce (objects, pages, classes …). We recommend to use this method.
Clone Sample Permission sets
The application gives two samples Permission Sets that can be used as stating. Go to the “Permission Sets” menu in the “Administration Setup/Manage Users” block (left bar navigation).

Because it’s not possible to add an assigned app in a Permission Set added to a package, it is necessary to clone those Sample Permission Sets and manually do some modifications.
-
For an End user:
Click on the “Clone” link in from of the “Galigeo EndUser” Permission Set. Enter the permission set information and click “Save”.

Back to the Permission Sets page list, click on the permission set “Custom SW End User”. Click on “Assigned Apps”, “edit” and add the application “galigeo.Galigeo”.
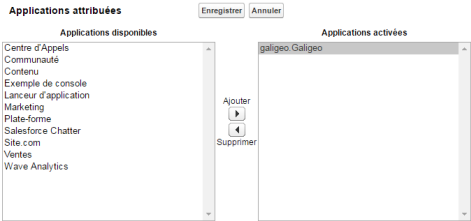
Click “Save”.
-
For an Admin user:
Clone the “Galigeo AdminUser” Permission Set. As for an End User, assign the same app to the list of the Assigned Apps for this Permission Set.
Because Admin need to be able to define analytics based on Datasource, this Permission Set needs to have access to a connected app. To do this, modify the property “Assigned Connected App”.
Depending on if the package is installed on a sandbox or in production (the entry point for the OAuth workflow is not the same), you need to enable the appropriate app:
- For Sandbox: enable the connected App “galigeo_sellwhere_sbx”
- For Production: enable the connected App “galigeo_sellwhere”
Create your own Permission sets
Go to the “Permissions sets” menu in the “Administer/Manage Users” block (left bar).
Create a « New » Permission Set:
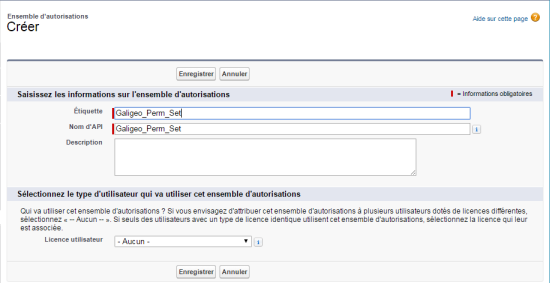
Now edit the Permission set properties.
For an end user
-
Assigned App
Add the Galigeo App to the permission sets.
App Name galigeo.Galigeo -
Objects Settings Permission
At least for all the following objects, the user should have READ access on the objects (in parenthesis, it’s the API name):
- Category (galigeo__Category__c)
- Data Source (galigeo__Data_Source__c)
- GeoFilter Condition (galigeo__GeoFilter_Condition__c)
- GeoFilter Definition (galigeo__GeoFilter_Definition__c)
- SW Map Object (galigeo__SW_Map_Object__c)
- Symbology (galigeo__Symbology__c)
- Thematic (galigeo__Thematic__c)
Permission Name Enable Read Yes Create No Edit No Delete No View all No Modify all No For each of these objects, the end user needs to have “Read” right on all their fields. For the following objects, the end user need to have a full CRUD rights:
- Visual Analytic (galigeo__Visual_Analytic__c)
- Visual DataSet (galigeo__Visual_DataSet__c)
- Visual Object (galigeo__Visual_Object__c)
Permission Name Enable Read Yes Create Yes Edit Yes Delete Yes View all No Modify all No -
Galigeo Tab
Galigeo tab is the main end user tab. Set the tab settings as Available and Visible.
Available Visible Yes Yes -
Apex Class Access
To be to see analytics on the client map, the permission sets must include the following Apex Classes:
Apex Class Name galigeo.AnalyticsDataSetRestService galigeo.AnalyticsDataSourceRestService -
VisualForce Page Access
Finally, here are the Visualforce pages needed to be accessible by an end user.
Visualforce Page Name galigeo.CreateEditVisualDataSet galigeo.map galigeo.mapmobile galigeo.MapPage galigeo.VisualDataSet galigeo.VizDataSetSharingRules
For an admin user
In addition to what an end user have access, an admin user should be able to create Map Objects, Symbologies, GeoFilters, Geographic Layers, Data Sources and Analytics. Here is what a permission sets for an admin user should contains.
-
Assigned App
Add the Galigeo App to the permission sets.
App Name galigeo.Galigeo -
Objects Permission
For all the following objects, the user should have a full CRUD access.
For all the following objects, the user should have full CRUD access on the objects (in parenthesis, it’s the API name):
- Category (galigeo__Category__c)
- Data Source (galigeo__Data_Source__c)
- GeoFilter Condition (galigeo__GeoFilter_Condition__c)
- GeoFilter Definition (galigeo__GeoFilter_Definition__c)
- SW Map Object (galigeo__SW_Map_Object__c)
- Symbology (galigeo__Symbology__c)
- Thematic (galigeo__Thematic__c)
- Visual Analytic (galigeo__Visual_Analytic__c)
- Visual DataSet (galigeo__Visual_DataSet__c)
- Visual Object (galigeo__Visual_Object__c)
| Permission Name | Enable |
|---|---|
| Read | Yes |
| Create | Yes |
| Edit | Yes |
| Delete | Yes |
| View All | Yes / No |
| Modify All | Yes / No |
For each of these objects, the admin user needs to have full CRUD rights on all their fields. Check the “View All” and “Modifiy All” properties depending on your Org object privacy policy.
-
Galigeo Tab
Galigeo tab is the main end user tab. This tab needs to be available and visible.
Available Visible Yes Yes Galigeo Admin tab is the main admin tab where he can manage all objects used by the App. Set the tab settings as Available and Visible.
Available Visible Yes Yes -
Apex Class Access
To be to see analytics on the client map, the permission sets must include the following Apex Classes:
Apex Class Name galigeo.AnalyticsDataSetRestService galigeo.AnalyticsDataSourceRestService -
VisualForce Page Access
Finally, here is the Visualforce pages needed to be accessible by an admin user.
Visualforce Page Name galigeo.CreateEditVisualDataSet galigeo.map galigeo.mapmobile galigeo.MapPage galigeo.VisualDataSet galigeo.VizDataSetSharingRules galigeo.CustomFilterLooup galigeo.CustomSymbologyLookup galigeo.DataSourceDetails galigeo.MapObjectCreateWizard galigeo.mapObjectDetails
Second method: give rule access by modifying a profile
Depending on your organization settings and security rules, SalesForce administrators would give special rule to a given profile. In this application, an end user doesn’t need to see the “Galigeo Admin” tab but only the “Visit Planning” tab. Also, He can only modify his Visual Data Set.
To achieve this, suppose we already have a profile named “Galigeo end user”. Go to the “Setup” menu (top right) and choose the “Profiles” menu in the “Administer/Manage Users” block (left bar). Click on “Edit”:

Depending on the profile, apply rights access to the objects, pages and classes as defined in the previous section.
Add a Geolocation field
The mapping process is based on latitude and longitude coordinates. To achieve this, a batch geocoding process is scheduled to geocode specified address fields for an object and the result is stored in a custom field of type Geolocation.
For each of the objects to be used on the map, it is necessary to create a new Geolocation field.
In what follows, we show how to add that specific field for a Standard Salesforce object Accounts. The process is the same for any Custom Object.
Go to Setup / Customize / Accounts and click on Fields link:
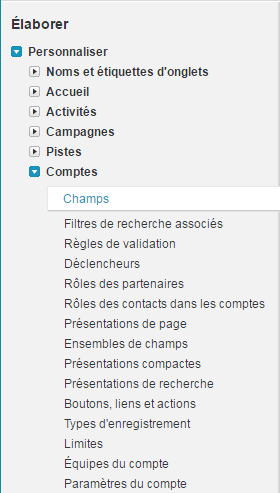
Click the “New” button in the “Account Custom Fields & Relationships” section to create a new custom field:

Select the radio button for the Geolocation data type and click “Next” to continue.
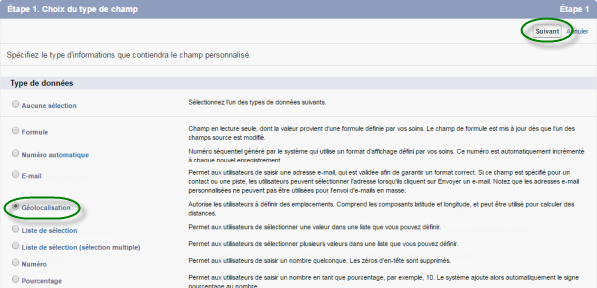
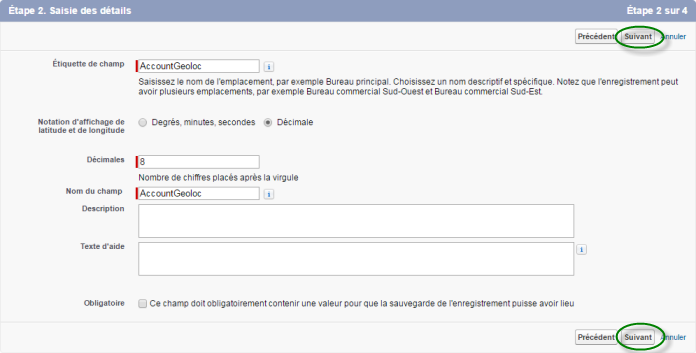
Enter a field label. Choose to display Latitude and Longitude as Decimal with 8 as decimal places value. Enter some description and help text. Then click “Next” to continue.
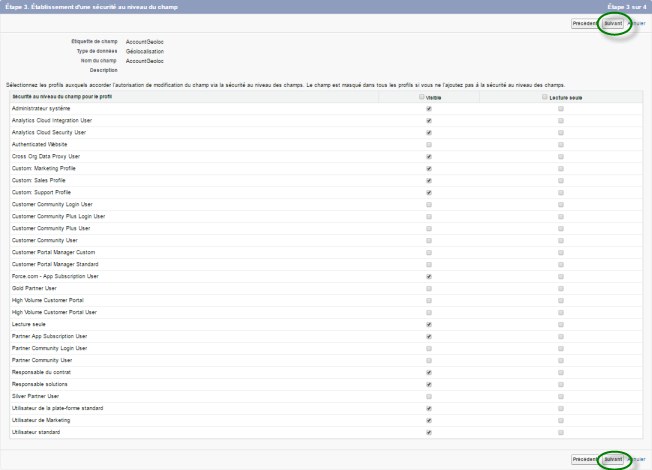
Define the field security level following your organization requirements. Then click “Next” to continue.
Define if this new field will be in the object page layout. And finally, click the “Save” to continue.

Back to the fields page of the Account object, the new custom field Account Geoloc is now created.
