Project Management
In this article
- New project
- Open/Delete a project
- Import a project
- Merge projects
- Reorder layer
- Activate project
- Save a project
- Export a project
New project

The creation of a project is started by pressing the button 
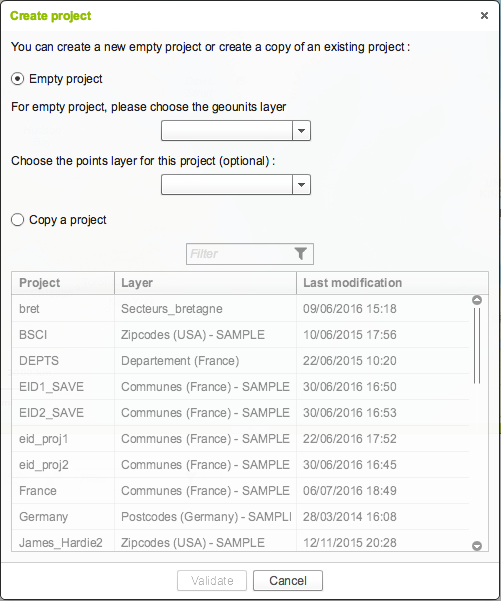
The project creation window is opening and is offering 2 solutions:
-
Start from an empty project
To do that, a sector layer has to be selected on which the project will be built. As a reminder, a project is based on only a sector layer. It is possible as well optionally to select a layer of points to view in the project.
The available points layers are defined in the administration module.
-
Create a copy of an existing project
The selected project is then copied and the user begins to work on this copy. For this option, a search bar allows to filter the list of available projects by the name
Once the form is completed, a window asking for the name of the new project will appear. Note that it is not possible to give the new project the name of an already existing one. Otherwise, an error message will appear.
Open/Delete a project

The opening of a project is done using the button 
The list of projects available to the user is displayed. A search bar allows to filter the list by the project name.
Also in this window one can delete a project using the button 
Import a project

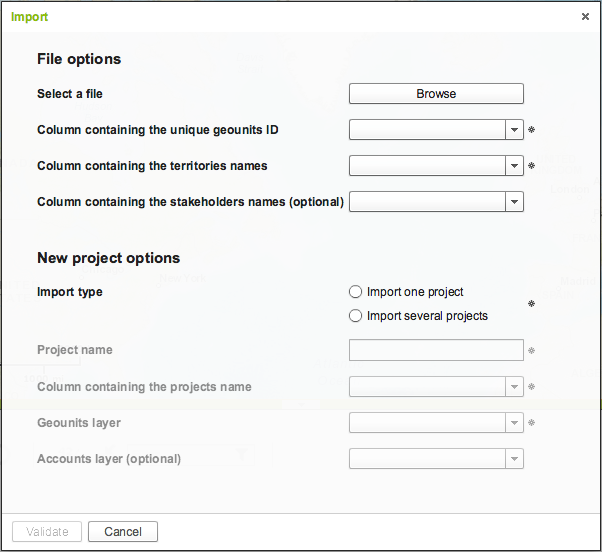
It is possible to create a project from a CSV or XLS file. The file has to contain a list of assignment of sectors/territories. The import of the file is done with the help of the button  .
.
In a CSV, the accepted delimiters are “;” or “,”. Attention, the XLSX format is not accepted. If the selected file is valid, the following message will appear: 
Afterwards there are several fields that have to be entered:
- Indicate the column containing the identifier of sectors (code INSEE for the commons, postal codes, etc.) - mandatory
- Indicate the column containing the name of territory to which belongs the sector - mandatory
- Indicate the column containing the name of the collaborator assigned to the territory - optional
- Indicate the project name - mandatory
- Indicate the layer that the sector used. Of course, this layer has to correspond to the type of sector contained in the file - mandatory
Merge projects

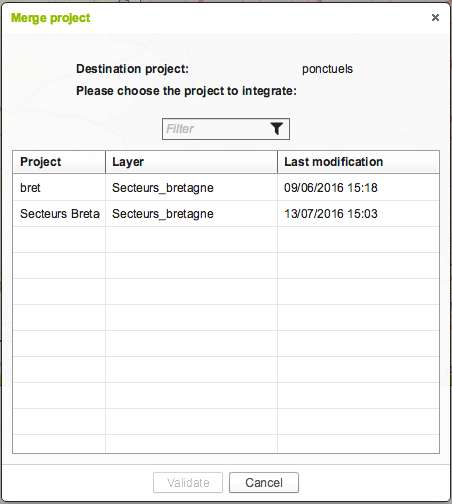
It is possible to merge two projects that share the same layer of sectors, i.e. to copy the content of a project (the source project) to another project (the target projects).
In order to do that, one has to click on the arrow at the right side of the target project, then click on the following button: 
In the following window, it is enough to select the source project and to validate. To keep in mind that the projects list contains only compatible projects, i.e. projects that share the same layer as the target project.
In order that the merge works, it is necessary to avoid ambiguities between the two projects:
- The territories of the two projects have to not overlay (from the geographical point of view)
- The territories of the two projects do not have common names.
Reorder layer
In the bottom right of the projects list panel, the following button allows user to reorder layers. This ensures an optimum visibility of the map between the Territory Management’s data and the possible added business data. Concretely, this reorders the polygons layers under the lines layers, themselves under the points layers. No reorder is done within layers of the same type.
Activate project
In order to edit a project, one has to click on the arrow down at the right hand side of the project, and then click on the following button:  .
.
A project that is about to be edited will display then in the window below. The project about to be edited is displayed highlighted in the projects list.
Save a project
The saving of a project is done using the button  or by using the key combination Ctrl-S.
Attention, if the project is about to be edited by another user, then it is not possible to
save it. In this case, the saving icon is grayed out and is displayed differently:  .
.
Attention, if the Internet browser is closed or the page is changed, the application does not check if the project was previously saved, and the changes will be lost.
Export a project
The exportation of a project is done using the button 
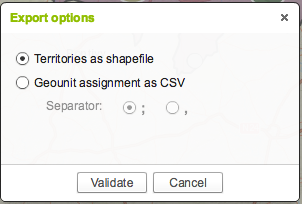
A window opens and allows to choose between two possible exportation options:

-
A shapefile of the territories. The geometry of the territories is exported to a shapefile as well as their attributes: name, representative and aggregate indicators. The color of the territories is not exported.
-
A CSV file of the assignments of the sector. A CSV is generated, and each line corresponds to a sector. All the sectors assigned to a territory in the project are exported. Every line contains all the available information on that sector (the equivalent of the sector table at the right hand side of the application). It is also added the name of the territory to which the sector belongs as well as the representative assigned to the territory.
Note: To be taken in the consideration is the fact that only the territories that are not filtered are exported for these two types of export (see chapter [« Visualisations »](/visualisations-adv-en) for more information).