Mobile app configuration
 |
No support provided for this free app. |
In this article
Mobile component
We will set up a page accessible from the menu of the mobile application (formerly Salesforce1). The component allows a sales rep in the field to view objects that are nearby.
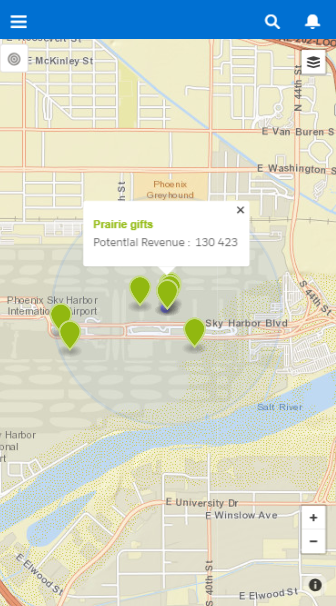
To achieve this, we will use the GeocodeComponentLocationSF1 component which has the following attributes:
| Attributes | Required | Information | |
|---|---|---|---|
| recType | Yes | Salesforce object type | |
| standardAddress | Standard Address field to use (for Account, Contact and Lead) | ||
| geoLoc | Field containing the coordinates | ||
| displayFields | List of fields to display in the infowindow | Visualization | |
| maxResults | Number of max results when searching nearby. The value is 10 by default | Visualization | |
| nearbyDistance | Nearby search default distance. The value is 10 by default | Visualization |
Creating the Visualforce page
Let’s create the Visualforce page that integrates the GeocodeComponentLocationSF1 component:
- In Setup > Develop > Pages
- Click on the “New” button to create a new page
- In the label input, enter the value “GeocodePDVLocationSF1”
- Check “Available for Salesforce mobile apps and Lightning Pages”
-
In the page code, put the following:
<apex:page showHeader="false" sidebar="false" standardController="Account" docType="html-5.0"> <head> <meta name="viewport" content="width=device-width, initial-scale=1.0, maximum-scale=1.0, user-scalable=no" /> </head> <body> <ggo:GeocodeComponentLocationSF1 recType="Account" geoLoc="GeoLoc__c" displayfields="Phone" maxResults="50" nearbyDistance="0.4"/> </body> </apex:page> - Click on the “Save” button to save the page.
Integration to the mobile application menu
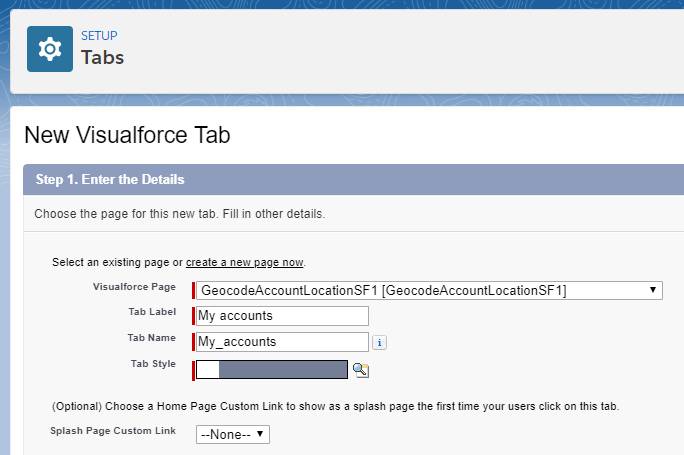
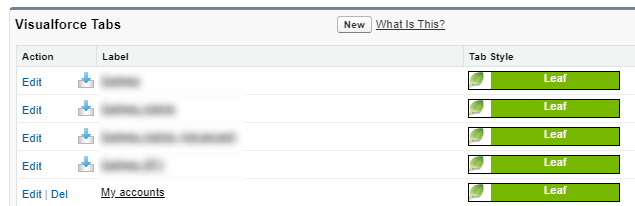
First, it is necessary to create a tab for the previously created page:
- In Setup > Create, click on the “Tabs” link.
- In the “Visualforce Tabs” section, click the “New” button.
- Choose the Visualforce page previously created, put “My Accounts” as a label for example (the field name will be filled in automatically),
-
Choose a tab style and click the “Next” button.
- Choose for which profile this tab will be available and click on the “Next” button.
- Disable insertion of this tab for all existing applications
-
Click on the “Save” button.
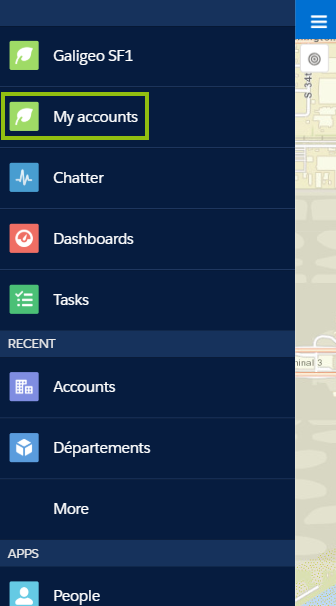
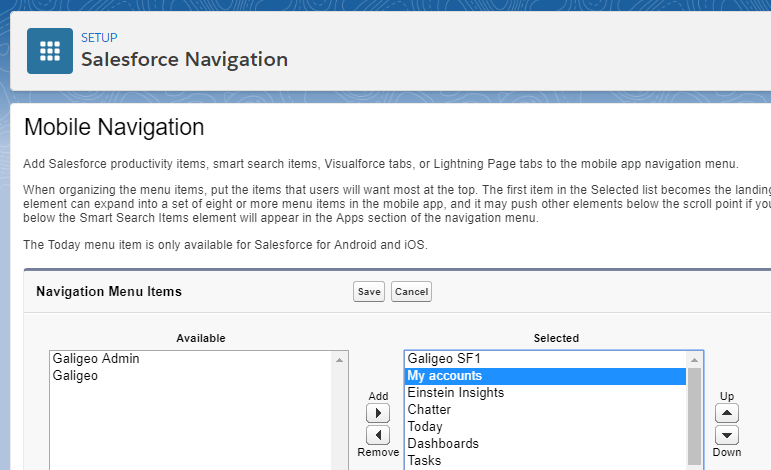
All that’s left is to add it to the menu of the Salesforce1 app:
- Go to Setup > Mobile Apps > Salesforce navigation,
- Click on the link “Mobile navigation”.
- Add the “My Accounts” tab to the navigation menu items
- Click on the “Save” button.
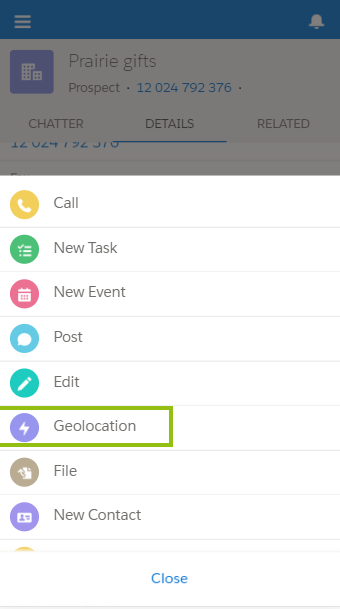
Salesforce1 Quick Action configuration
The last component is appropriate for mobile usage. It can be integrated with a Visualforce page that will be used for a Quick Action.

To achieve this, we use the GeocodeComponentQuickActionSF1 component that has the following attributes:
| Attributes | Required | Information | |
|---|---|---|---|
| recId | Yes | Salesforce object id | Address attributes |
| recType | Yes | Salesforce object type | Address attributes |
| street | Yes | Address field where the street is | Address attributes |
| city | Yes | Address field where the city is | Address attributes |
| postalCode | Yes | Address field where the postal code is | Address attributes |
| state | Yes | Address field where the state (or region) is | Address attributes |
| country | Yes | Address field where the country is | Address attributes |
| geoLoc | Yes | Field containing the coordinates | |
| normStreet | Field where the street will be saved | Normalized address attributes | |
| normCity | Field where the city will be saved | Normalized address attributes | |
| normPostalCode | Field where the postal code will be saved | Normalized address attributes | |
| normState | Field where the state (or region) will be saved | Normalized address attributes | |
| normCountry | Field where the country will be saved | Normalized address attributes | |
| displayFields | List of fields to display in the infowindow | Visualization | |
| maxResults | Maximum number of results when searching by proximity. The value is 10 by default. | Visualization | |
| nearbyDistance | Default distance of proximity search. The value is 10 by default. | Visualization |
Attributes are the same as those of the GeocodeComponent component used previously, and this component is configured in the same way.
Creating the Visualforce page
We will create a Visualforce page which integrates the “GeocodeComponentQuickActionSF1” component.
- In Setup > Develop > Pages
- Click on the “New” button to create a new page
- In the label input, enter the value “GeocodeAccountQuickActionSF1”
-
In the page code, put the following:
<apex:page showHeader="false" sidebar="false" standardController="Account" docType="html-5.0"> <head> <meta name="viewport" content="width=device-width, initial-scale=1.0, maximum-scale=1.0, user-scalable=no" /> </head> <body> <ggo:GeocodeComponentQuickActionSF1 recId="{!Account.id}" recType="Account" street="BillingStreet" city="BillingCity" postalCode="BillingPostalCode" state="BillingState" country="BillingCountry" geoLoc="geoLoc__c" displayfields="Phone" normStreet="Normalized_Street__c" normCity="Normalized_City__c" normPostalCode="Normalized_Postal_Code__c" normState="Normalized_State__c" normCountry="Normalized_Country__c" maxResults="50" nearbyDistance="0.4"/> </body> </apex:page> - Click on the “Save” button to save the page.
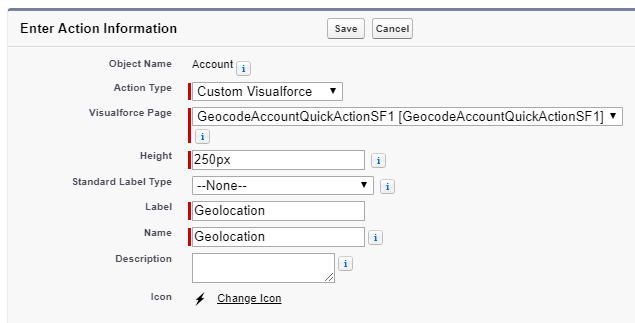
Creating a Quick Action
First, we must create an action that references the previously created Visualforce page.
- In Setup > Object Manager > Accounts > Buttons, Links and Actions
- In the “Buttons, Links and Actions” section, click on “New Action”
- In the dropdown list of action type, pick “Custom Visualforce”
- In the dropdown list of Visualforce pages, choose the page “GeocodeAccountQuickActionSF1”
- In the label input, enter “Geolocation”
-
Click on the “Save” button.
Now that the custom action is created, all you have to do is to add it to the Account layout page.
- In Setup > Customize > Accounts > Page layouts
- In the “Page layouts” section, click on “Edit” in front of the desired layout.
- In the layout editing page, click on the “Actions” category
- In the “Quick Actions in the Publisher”, click on “override the global publisher layout”.
-
Insert the “Location” action in the section “Quick Actions in the Publisher”
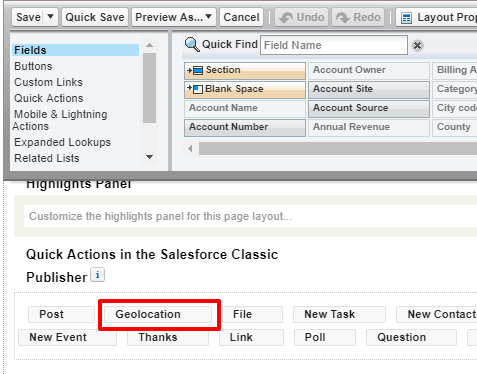
- Click on the “Save” button